Ever wanted to animate a character for a video, but you never really had the time or skills to do so? In the past, making your own avatar felt like a big job, something that only the pros, with their fancy software, could pull off. But it’s way easier these days, thanks to some handy tech. You can make your own avatar without spending hours or using complicated tools. As a matter of fact, with the right online helper, you can create a digital character in just a few minutes, transforming an ordinary photo into something that looks, speaks, and moves like you do.
That’s where AI comes in to mix it up. It enables you to make your own avatar with realistic, engaging expressions. Whether you’re spicing up a story or explaining a concept, having an AI avatar speak for you adds some sizzle. And the best part? (You don’t need to know how to design anything.) Just choose a tool that does the grunt work, and you’re ready to roll your own avatar—in fact, this article will guide you to do it in just 2 minutes.
Why Create a Talking Avatar?
Think about it – videos with talking characters grab attention fast. They’re perfect for teachers sharing lessons, marketers pitching products, or even friends making silly clips. An AI talking avatar makes content feel alive and personal, like having a digital buddy on screen. Plus, it saves time since you skip filming yourself or hiring actors.
But why bother with one? Well, these digital presenters can mimic real expressions, syncing lips to words perfectly. That means your message comes across as clear and fun. If you’re running a small business, imagine using one to welcome visitors on your site. Or for educators, picture historical figures “speaking” in class. The possibilities stretch far, making everyday communication more dynamic.
And let’s not forget the creative side. Kids love seeing their drawings come to life, while creators use them for storytelling. It’s all about adding that human touch without the hassle. With AI, you can make your own avatar quickly and straightforwardly, fitting right into busy schedules.
The Best Tool for Making Talking Avatars: Mango AI
When it comes to reliable options, Mango AI stands out as a go-to for avatar creation. This tool turns simple photos into animated speakers effortlessly. It’s designed for anyone, from beginners to pros, and focuses on ease. You can make your own avatar easily with this tool.
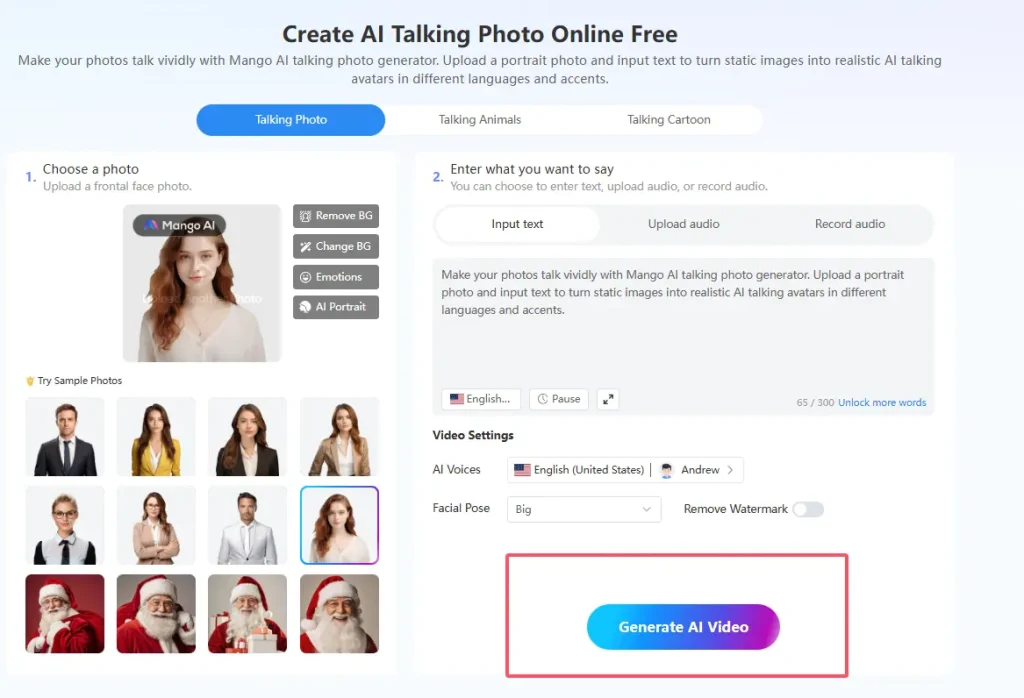
One key thing Mango AI offers is the ability to upload your own photo to start. You can pick formats like JPG, JPEG, PNG, or WebP. Another feature lets you choose from sample photos if you don’t have one ready. The tool includes options to remove backgrounds for a clean look. You can also change the background to fit your style. Adding emotions helps make the character express feelings naturally. There’s also an AI portrait enhancement to elevate the image.
Mango AI supports entering text for the avatar to say. You can also upload audio files instead. Recording your own voice is another way to input sound. It offers natural AI voices for smooth speech. Facial poses can also be adjusted to match the tone. Finally, generating the video happens quickly, letting you make your own avatar in no time.
All this comes together in the talking avatar section, which you can access directly at the talking avatar page. It’s free to try online, making it accessible without downloads.
How to Use Mango AI to Make Your Own Talking Avatar
Ready to make your own talking character? Here’s a straightforward guide to make your own talking avatar using Mango AI. It really takes about two minutes once you’re set up. This guide will walk you through each part with clear screenshots guiding you from start to finish.
Step 1: Head to the Talking Avatar Tool Page and Pick Your Avatar Base
Start by visiting the Talking Avatar Tool Page on Mango AI. You’ll see an option to “Upload or choose a talking avatar” right away. Click it to add your photo – go for a clear portrait shot. If you want to test first, select one of the sample photos provided, like options for different styles. This sets the foundation to make your own avatar.
Step 2: Customize the Look
Once your photo is in, tweak it to perfection. Use the “Remove BG” option if you need a transparent setup. You can also swap in a new background from the choices available. Add emotions to give your digital presenter some personality, like a smile or surprise. If you want to perform a faceswap, you can use the “AI Portrait” option—choose from presets or upload your own photo. These tweaks make your digital presenter feel unique.

Step 3: Add What Your Avatar Will Say
Now, choose your words. Type text directly into the box and select a natural AI voice from the available options to bring it to life. Or upload an audio file if you already have one prepared. You can even record live using your mic. The tool automatically syncs lip movements with the sound, helping you make your own avatar impressive.
Step 4: Fine-Tune Settings and Generate
Once everything looks good, hit the generate button. The AI processes it fast, creating a short video clip of your talking avatar. Download it without watermarks if you choose that option.
Tips to Make Your Own Avatar Stand Out
- Start with high-quality photos – Clear facial images work best for smooth animations.
- Experiment with different voices – Choose voices that match the vibe of your avatar: happy for fun posts, serious for explanations.
- Add themed backgrounds – Pick backgrounds that accent your story. For instance, a beach scene works well for travel stories.
- Infuse emotion into simple gestures – Small details, like a raised eyebrow, can make points funnier or more engaging.
- Save custom settings – If creating multiple avatars, save your custom configurations for repeat use.
- Always preview before finalizing – Make tweaks as needed to ensure everything looks perfect.
Use Cases for Your Custom Talking Avatar
These avatars shine in various spots. For social media, make your own avatar to share tips or jokes – it boosts engagement. Businesses use them for quick product demos, where the avatar explains features without needing a spokesperson.
In education, teachers can turn large blocks of static text into vivid talking avatar videos, making lessons interactive and captivating. Content creators love them for YouTube intros, adding a personal touch. Even for personal fun, turn family photos into talking memories for reunions.
Think about marketing too – an avatar welcoming site visitors can increase time spent on pages. Or in gaming, custom avatars enhance player profiles. The versatility is huge, fitting creative and practical needs alike.
Conclusion
Wrapping up, creating a talking avatar doesn’t have to be tough or time-consuming. With tools like Mango AI, you can make your own avatar in mere minutes, bringing ideas to life effortlessly. It’s empowering to see a photo transform into something dynamic and expressive.
So, why wait? Give it a shot and make your own avatar today – you’ll be amazed at how quick and rewarding it is. Whether for work or play, these creations open up new ways to connect and share.
Make Your Own Avatar with Mango AI