Mango Animation Maker (Mango AM) is designed to help you create fully customized and professional animation videos quickly and easily.
This article will give you a brief introduction about Mango Animation Maker and how to create an animation video in simple 4 steps.
Mango AM Workplace
Mango AM Workplace is where you can create or manage your projects.

Mango AM Editor
Mango AM Editor has a user-friendly interface that enables you to create animation videos with easy-to-use tools.
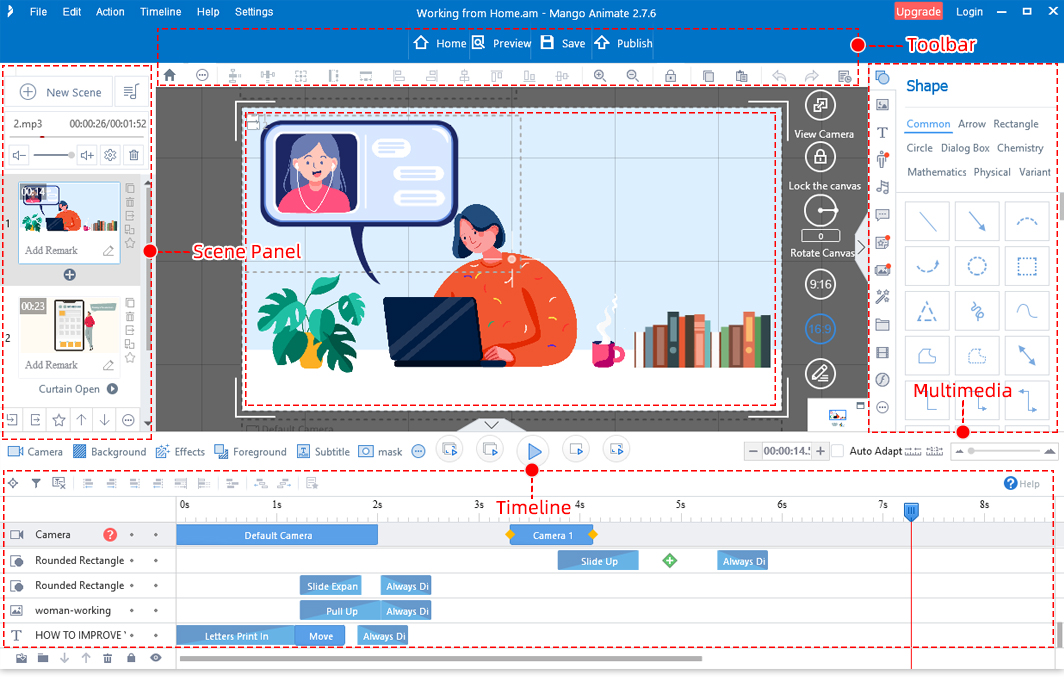
Canvas
This is the area where you build your scene.
Scene Panel
The Scene Panel is used to display all your scenes in thumbnail view. In this area, you can manage your scenes, including adding, copying, deleting and replacing scenes.
Timeline
The Timeline presents the duration and animation effects of all the objects. You can use it to control the timing of the objects so that your scene can play properly.
Multimedia
On the right-side toolbar, you can add multimedia content (images, shapes, sounds, videos, and more) to enrich your scenes.
Toolbar
The Toolbar is used to edit a single object or multiple objects (aligning, layering objects, and more) easily and quickly.
Create a Professional Animation Video in 4 Steps
Step 1: Create a New Project
After logging in to Mango AM, you will access your Workplace.
You can create a new project in 3 ways:
1. Use a pre-designed template
2. Start with a blank project
3. Import a PowerPoint presentation
Use a pre-designed template
Mango AM provides lots of ready-made online templates, allowing you to create an animation video with ease. Just select and click on the template you like, then you can customize the template according to your needs.

Start with a blank project
Click the "New Project" button to create a new blank project.

Import a PowerPoint presentation
You can import your PowerPoint Presentation into Mango AM to create a project.

Step 2: Add Multimedia Content
Once you create a project, it will be opened in the Mango AM Editor.
1. Add a New Scene
An animation video is made up of several scenes. To create a new scene, you can click the "+ New Scene" button on the Scene Panel.
If you want to add scene transitions, just click the "+" button between two scenes, and select a transition effect.

2. Add Multimedia Content
You can add multimedia content (images, shapes, texts, GIF, SVG, videos, sounds, and more) to build your scenes.
Example: add an image
*Note that the following steps also apply to other multimedia.
(1) Click the "Image" tab on the right-side toolbar.
(2) Select an image on the library or add a local image > Click the image to add it to the scene (or simply drag and drop the image to the scene).

(3) Customize the image.

* You can use the top toolbar to edit a single object or multiple objects (such as flipping an object, aligning or layering objects on the scene) easily.

Step 3: Animate Everything
Once you have placed an object on the scene, a corresponding timeline will be added. On the Timeline, you can apply enter, emphasis and exit effects to the objects and liven up your video.
1. Select the object that you want to work on. The timeline of the selected object will be highlighted.

2. On the selected timeline, double click the effect, and select the effect that meets your needs in the pop-up window.

3. Click the "+" button on the selected timeline to add new effects.

4. Adjust the object's duration: drag the left or right edge of the object's duration to the desired time.

Step 4: Publish and Share
Click the "Preview" button to view the video. Once you are happy with the result, click the "Publish" button to publish and share your animation video.
1. Click the "Publish" button

2. Select a format (Publish to Cloud, Video, or Gif)

3. Choose how you'd like to publish your video on the Publish Options window.

After you've published your video, you can share your animation video on social media channels.